Wednesday 24 February 2010

Help me pick my next cross stitch project!

I'm getting that feeling again, folks - it's time to embark on another large cross stitch that will, no doubt, take about 6 months and cause me much misery and madness. But there's nothing quite so satisfying as having stitched something so large and so special. Last year I made a Starship Enterprise, and the year before that it was a Fantastic Flying Petrelli. But what shall it be this time?

Before we get to that, however, a quick diversion to explain why I stitch the things that I do.

I hated all the forms of sewing and crafting that I learned as a child. But then I got back into cross stitching a few years ago after stumbling across the concept of subversive cross stitch. I liked the idea of working in a medium with so many connotations and stereotypes (traditionally feminine, old-fashioned, sweet-to-the-point-of-nauseating) and creating something so counter to those ideas. An early project of mine was to stitch the sweary-est of swear words on a cushion. I must find a picture of that some day.

Anyhow, I'm far from alone in finding it great fun to craft items that are pretty far removed from your grandma's "home sweet home" sampler (no offense to your grandma, of course). I've seen many great pieces of subversive cross stitch and other crafts over the years, and there are two I'd like to share before I try to make my decision on Operation Cross Stitch of Doom 3.0.

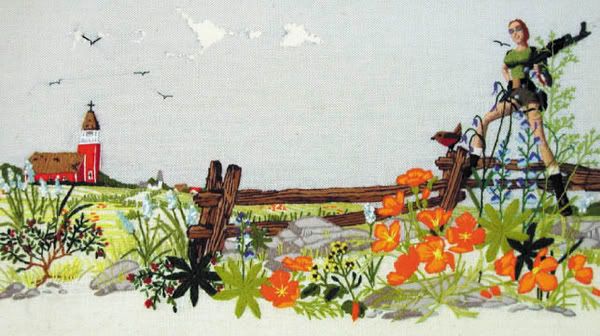
Becky Schaefer's work adds unexpected touches to otherwise traditional needlepoint landscapes. This one featuring Lara Croft is my particular favourite:


And then there's Noelle Mason's work ‘Nothing Much Happened Today (for Eric and Dylan)’ a cross stitch of a security camera image of the Columbine High School shooting. I won't post a pic of it in this post for those who might not want to see it, but if you are interested, check it out here. It's definitely not a fluffy, nice piece of work, and I'm not sure I'd ever want to make something similar, but it did make me think. And isn't that always the point of any artistic endeavour?

And so, finally, we get to the point. I know exactly what kind of project I want to stitch next, but I don't know exactly what image I want to work from. I need your help, peoples of the interwebs! It is going to be an image of a fictional woman, committing, or about to commit a violent act. It has to be a fictional character because I'm totally fine with fictional violence, I even really enjoy it in some shows and movies. But real life violence is not so awesome. It has no cool soundtrack and people don't magically heal completely about 2 minutes later. And it has to be a woman because that fits with the subversion of expectations concept. But which fictional woman? Buffy? Ellen Ripley? Sarah Connor? Kara 'Starbuck' Thrace? Someone else? And what specific image do I want? If it's Ripley, surely it has to be the the "get away from her, you bitch" scene from Aliens where she's in the mechanical power-loader thingy. And if it's to be Buffy, I'd love to try and capture the sheer rage in Buffy's eyes from the moment she gets back up in Chosen and tells the First Evil to "get out of my face". But there's so many images flying through my brain and my google-fu is failing me right now, so advise me. Help me internet, you're my only hope!

Tuesday 16 February 2010

T-Shirt Tutorial

Ages ago I promised I'd post a tutorial about how to make a "bleached out" t-shirt design. And here it (finally!) is.

So, without any further ado, how did I go from finding this pumpkin carving, to making this t-shirt? And how can you make your own?

batman-pumpkin-carving  batman3

 
Things you will need:
A dark coloured t-shirt
Something to be a stencil (options discussed below, I'm using freezer paper on this project)
A craft knife
Something that is safe to cut on
An iron that has both steam and no steam options
A paint brush
Something to "bleach out" the colour (I'm using a paste that takes the colour out of fabric)
Fabric pen or paint in the colour of the t-shirt fabric (optional)
 
First of all, you need to pick an image for your design, and then make it practical to be a stencil. As you can see I've just nicked someone else's pumpkin idea to make this quick and easy. If you need to turn a full colour, complicated image into a silhouette for a stencil, then this tutorial is pretty good at helping you through that process. Remember that you want to cut out the pieces that will be light, leaving behind the dark, so dark bits floating in the middle of light spaces can sometimes be tricky, although not impossible (see Spock's eyebrow and eye, or Audrey Hepburn's eyes in other t-shirts I've made)

I use freezer paper for my stencils, because they can be ironed on to the t-shirt, making the process nice and simple. You can use pretty much anything though - card and acetate work well, if you tape them onto the t-shirt, or sticky back plastic (known as contact paper in the US) can also do the job (remember to flip the image if you're printing it directly onto the sticky back plastic, as you're printing on the back).

I inverted the colours of my image to save ink and printed it directly onto the freezer paper.

tutorial1

Then cut it out. I use my awesome fingertip craft knife (so much easier for cutting around corners than a regular craft knife) on a cutting mat so that I don't damage anything!

tutorial3

So, that's the stencil all ready.

tutorial2

Iron the freezer paper onto your t-shirt (at an appropriate temperature for the fabric, with no steam).  Make sure that all the pointy bits are firmly stuck down.

tutorial4

Now it's time to remove the colour from the t-shirt. Some people use bleach, but I find it really difficult to work with and it can damage delicate fabrics. So I use discharge paste. I know, I know, worst name for a product ever. And it doesn't help matters that it's a gloopy, smelly paste, but the results it can give you are worth putting up with all its drawbacks.

tutorial5

Brush the paste onto the fabric, making sure all the open stencil areas are covered evenly.

tutorial6

Leave it to dry for a few hours then peel the stencil off. If you're careful you can remove the stencil in one, allowing you to use the stencil again.

This is a weird picture of how the paste looks as it's drying.

tutorial7

I'm afraid there's no photo of this next step, as I just didn't trust myself not to damage the camera. Make sure you're in a well ventilated room for this bit.

Set your iron to it the lowest temperature at which it produces steam, and set it to give off the most steam possible. Then you steam the paste off your t-shirt and it takes the dark coloured dye with it, leaving a pale colour right before your eyes. It's almost like magic, except very smelly. I can't tell you exactly what colour will be left behind, as it varies from one colour of t-shirt to the next, and also depends on the fabric. It will be somewhere in the region of beigey-ecru-pale yellow. It often appears to be quite an orangey-yellow right after ironing, but if you leave it for a few minutes it often lightens up. So far, I've concluded that it works best on black, bright pink, purples and red. It does very strange things to green, and brown can often be a bit unpredictable.

Sometimes at this stage there may be sections of the design that haven't lightened as much as you would have hoped, so I occasionally apply another coat of paste and start the whole process over. The colour is rarely completely even all over, unless you have an amazing skill with the application of the paste, but often that adds to the charm of the design. Fabric with discharge paste on it needs to be washed before wearing to make it as soft as it was before. The paste does not damge the fabric.

Other times, there may be slight smudges, where some paste escaped under the stencil, or the iron moved some paste that was still quite wet. That ends up looking like this:

tutorial8

This is the point where a fine tipped fabric pen, in the same colour as the t-shirt, comes in very handy, to just tidy up the design a little.

tutorial9

And there we have it, one silhouetted Batman t-shirt!

batman1

I've never done a tutorial like this before, so if I've left anything unclear, or you'd like further explanation of any point, then please let me know.